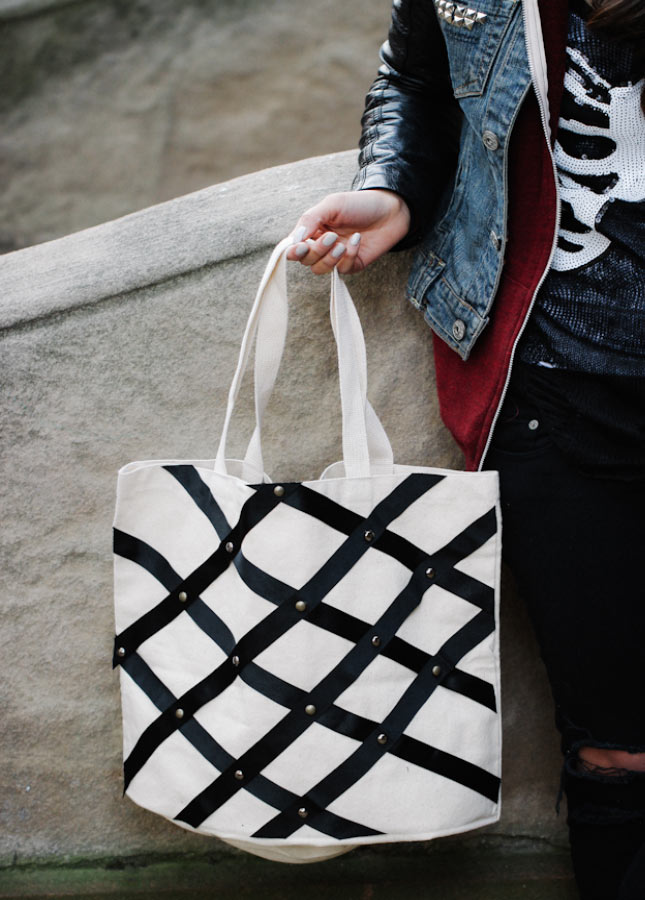
DIY: Lattice Canvas Tote Bag

With the Christmas season around the corner, and school holidays approaching, we've found this great tutorial over here, perfect for both kids and adults. Supplies are easy to get a hold of and these totes could make great gift bags (instead of wasteful paper wrapping.)

Supplies:
- Large Organic Canvas Tote Bag
- Grosgrain Ribbon (Lots of it! The exact amount will depend on the size of your tote bag. I recommend buying more than you think you need, just to be safe. Width & color is up to you. Go crazy! Maybe a green & red theme for Christmas!)
- Fabric Glue
- Iron-On/Flat Back Studs
- Strong Craft Glue
- Fabric Scissors
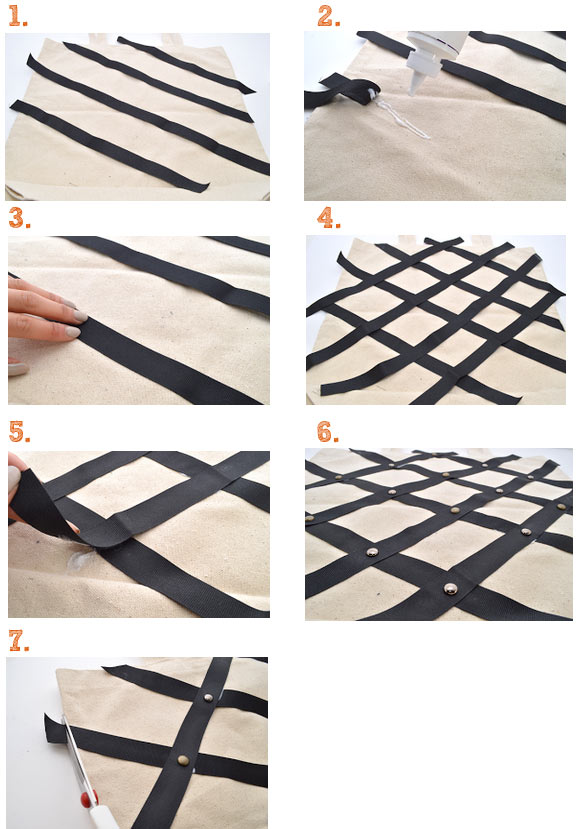
1) Cut 4 strands of ribbon to be placed diagonally across the tote bag, + 1-2 inches (2.54 - 5.08 centimeters) on each end. I'd recommend laying the ribbon across the tote bag before cutting to ensure that the strand is long enough.
2) Add a thin line of fabric glue directly to the tote bag, under each strand of ribbon.
3) Pat down gently to secure. Repeat with Steps 2 and 3 with each strand of ribbon.
4) Cut 4 more strands, to be placed diagonally/opposite of the initial 4.
5) Add fabric glue.
6) If you'd like, add iron-on/flat back studs where the ribbons cross. I recommend adhering them using glue (like E6000); I'm not quite sure what heat would do to the fabric glue underneath the ribbon (if anything at all!) - so I used glue just to be safe.
7) Using the fabric scissors, trim the ribbon ends along the edge of the tote bag. Let the glue dry overnight.
Tutorial found over at studs & pearls
Explore Popular Articles
The Australian Clothing Size Guide: How to Find Your Size in Any Garment
Why Sizing Clothing in Australia Is More Complicated Than It Should Be You find a polo you want for...

2026 Wardrobe Reset: 7 Essential Basics You Actually Need
Quick Summary A strong basics wardrobe is built on fit, fabric, and repeat wear. Start with tees, p...
Top Tips For Sourcing Trips In China: What I Learned On The Ground
Planning a sourcing trip to China for apparel, fabrics or factory visits? The most significant fri...
Blank Clothing Black Friday Sale 2025
Black Friday has officially arrived at BlankClothing.com.au, and this year’s event is bigger than e...